The short answer is a resounding yes! Many homeowners wonder‚ “can you paint laminate kitchen cupboards?” The good news is that with the correct preparation and the right materials‚ you absolutely can transform your laminate kitchen cupboards‚ giving your kitchen a fresh‚ updated look without the expense of a full replacement. This project‚ while requiring patience and attention to detail‚ offers a cost-effective way to revitalize your space and achieve a custom aesthetic that reflects your personal style. By understanding the proper techniques‚ you can achieve a durable and beautiful finish that will stand the test of time.
Why Consider Painting Your Laminate Kitchen Cupboards?
Painting laminate cupboards is an increasingly popular renovation choice‚ offering several compelling advantages over replacing them entirely.
Cost-Effective Renovation
Replacing kitchen cabinets can be one of the most expensive home renovation projects. Painting offers a fraction of the cost‚ allowing you to update your kitchen’s appearance significantly without breaking the bank. This makes it an ideal solution for those on a budget or looking for a temporary refresh.
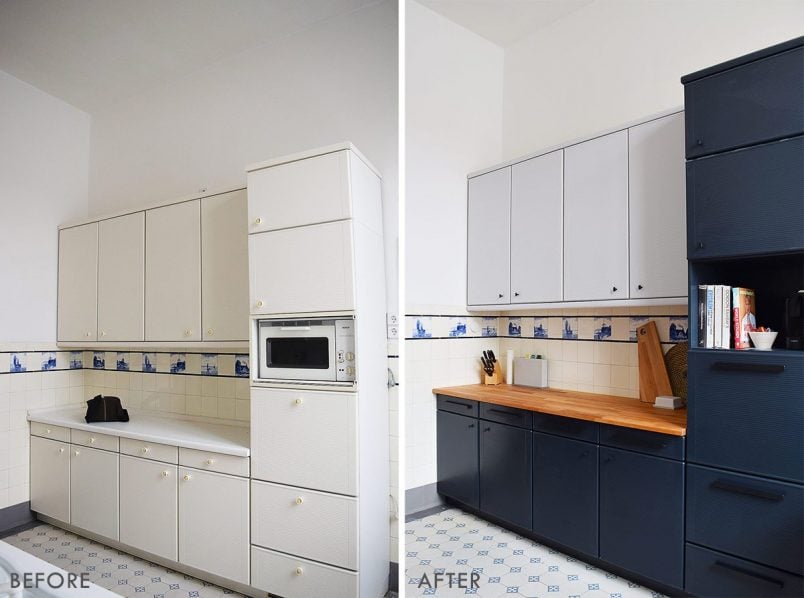
Aesthetic Transformation
Are your current laminate cupboards dated‚ discolored‚ or simply not matching your desired aesthetic? Painting them opens up a world of color possibilities‚ allowing you to completely change the mood and style of your kitchen. From modern grays to classic whites or bold accent colors‚ the choice is yours.
Sustainability
By choosing to paint rather than replace‚ you’re also making an environmentally conscious decision. You’re extending the life of existing materials‚ reducing waste that would otherwise end up in landfills‚ and minimizing the environmental impact associated with manufacturing new products.
Essential Preparation for Painting Laminate Cupboards
The success of painting laminate kitchen cupboards hinges almost entirely on thorough preparation. Skimping on these initial steps will undoubtedly lead to a less durable and aesthetically pleasing result.
Cleaning is Crucial
Laminate surfaces in a kitchen environment often accumulate grease‚ grime‚ and food residue. Before any sanding or painting‚ a meticulous cleaning process is non-negotiable.
- Degrease: Use a strong degreaser‚ such as a TSP (trisodium phosphate) substitute or a heavy-duty kitchen cleaner‚ to remove all traces of oil and grease.
- Rinse Thoroughly: Wipe down all surfaces multiple times with clean water and a clean cloth to ensure no cleaning product residue remains. Allow to dry completely.
Sanding for Adhesion
Laminate is notoriously smooth and non-porous‚ which makes paint adhesion difficult. Light sanding creates a “tooth” for the primer and paint to grip onto.
- Light Scuff Sanding: Using a fine-grit sandpaper (180-220 grit)‚ lightly sand all surfaces you intend to paint. The goal is not to remove the laminate‚ but to dull the glossy finish.
- Dust Removal: After sanding‚ thoroughly wipe down all surfaces with a tack cloth or a damp cloth to remove all sanding dust. Dust can compromise paint adhesion and create a bumpy finish.
Priming for Success
A high-quality adhesion primer is the most critical step for painting laminate. It acts as a bridge between the slick laminate and your chosen paint.
- Choose the Right Primer: Look for primers specifically designed for slick surfaces like laminate‚ melamine‚ or high-gloss finishes. Oil-based or shellac-based primers often offer superior adhesion.
- Apply Thin Coats: Apply one or two thin‚ even coats of primer‚ allowing adequate drying time between coats according to the manufacturer’s instructions;
Choosing the Right Paint for Laminate Kitchen Surfaces
Once your preparation is complete‚ selecting the appropriate paint is the next vital decision. The ideal paint will offer excellent adhesion‚ durability‚ and resistance to moisture and wear‚ ensuring the chosen product adheres well to your laminate kitchen cupboards.
Types of Recommended Paints:
- Urethane-Modified Acrylics: These offer a hard‚ durable finish and excellent adhesion. They are water-based‚ making cleanup easier.
- Cabinet & Trim Enamels: Many brands offer specialized paints formulated for cabinets‚ providing a smooth‚ durable finish that can withstand kitchen wear and tear.
- Epoxy Paints: While very durable‚ epoxy paints can be more challenging to work with due to their two-part mixing process and strong fumes. They offer exceptional hardness and chemical resistance.
Always choose a paint designed for high-traffic areas and surfaces that require frequent cleaning.
The Painting Process: Step-by-Step
With proper preparation and the right materials‚ the actual painting can begin. Patience and thin coats are key to a professional-looking finish.
Removing Hardware
Before you start painting‚ remove all doors‚ drawer fronts‚ hinges‚ handles‚ and any other hardware. This allows for a much cleaner and more professional finish without awkward brush marks around fixtures. Label everything to ensure easy reassembly.
Application Techniques
Whether you choose to brush‚ roll‚ or spray‚ the technique matters:
- Brushing: Use a high-quality synthetic brush for smooth application‚ especially for detailed areas and edges.
- Rolling: A small foam roller or a fine-finish roller will provide the smoothest finish on flat surfaces‚ minimizing brush strokes.
- Spraying: For the most professional and smoothest finish‚ a paint sprayer is ideal. This requires masking off surrounding areas thoroughly.
Apply multiple thin coats rather than one thick coat. This prevents drips‚ improves adhesion‚ and results in a harder‚ more durable finish. Lightly sand with 220-grit sandpaper between coats for an even smoother result‚ removing dust thoroughly each time.
Drying and Curing Times
Pay close attention to the manufacturer’s recommended drying times between coats. More importantly‚ understand the difference between “dry to touch” and “fully cured.” Paint might feel dry in a few hours‚ but its full hardness and durability develop over days or even weeks. Avoid heavy use or harsh cleaning during the curing period.
Finishing and Maintenance
The final steps involve carefully reassembling your cupboards and understanding how to maintain their new finish.
Reassembly
Once all coats are dry and you’ve allowed for some initial curing time‚ carefully reattach hinges‚ doors‚ drawer fronts‚ and hardware. Be gentle to avoid chipping your fresh paint.
Curing Patience
Give your newly painted cupboards at least a week‚ or even two‚ before subjecting them to heavy use or vigorous cleaning. The longer you let them cure‚ the more durable the finish will be.
Cleaning Painted Laminate
Use mild soap and water with a soft cloth for routine cleaning. Avoid abrasive cleaners‚ scrubbing pads‚ or harsh chemicals‚ as these can damage the painted surface.
Frequently Asked Questions (FAQ)
Q1: How long does painted laminate last?
A1: With proper preparation‚ high-quality materials‚ and good maintenance‚ painted laminate cupboards can last for many years‚ often 5-10 years or more‚ before needing a touch-up or repaint.
Q2: Do I need to remove the laminate before painting?
A2: No‚ you do not need to remove the laminate. The entire process relies on properly preparing and priming the existing laminate surface to accept paint. Removing it would be a much larger‚ more complex‚ and often unnecessary project.
Q3: What kind of primer is best for laminate?
A3: An adhesion primer specifically formulated for slick‚ non-porous surfaces like laminate‚ melamine‚ or high-gloss finishes is essential. Brands like Zinsser B-I-N Shellac-Base Primer or Kilz Adhesion are often recommended.
Q4: Can I paint over peeling laminate?
A4: If the laminate is peeling or delaminating significantly‚ it’s best to address that issue first. You may need to carefully re-adhere the peeling sections with a strong adhesive or remove the loose parts if they are beyond repair‚ then fill and sand smooth before proceeding with priming and painting. Painting over unstable laminate will not provide a durable finish.
Indeed‚ with the right strategy and a commitment to proper steps‚ you can successfully paint laminate kitchen cupboards‚ achieving a beautiful and long-lasting update to your kitchen. This DIY project is incredibly rewarding‚ offering a personalized touch and a significant transformation for a fraction of the cost of new cabinets. Remember‚ thorough preparation and patience are your best tools for success.