Learning how to draw a simple car can be a rewarding and enjoyable experience, even for those who are just starting their artistic journey. It doesn’t require complex techniques or specialized tools; with a few basic shapes and a clear step-by-step approach, anyone can create a recognizable vehicle. This guide will walk you through the entire process, breaking down each stage into manageable steps, ensuring you understand exactly how to draw a simple car without feeling overwhelmed. By the end, you’ll have the confidence to sketch various vehicles and further develop your drawing skills.
Getting Started: Essential Tools for Drawing a Basic Automobile
Before you begin sketching, gather a few basic supplies. You don’t need anything fancy, just the essentials to get your ideas onto paper. Having the right tools makes the process smoother and more enjoyable. - Pencils: A standard graphite pencil (HB or 2B is good for general sketching, while a lighter H pencil can be used for initial guidelines).
- Eraser: A good quality eraser (kneaded or vinyl) is crucial for correcting mistakes and cleaning up your lines.
- Paper: Any plain drawing paper or even printer paper will work perfectly.
- Ruler (Optional): While not strictly necessary, a ruler can help you draw straight lines for the body of the car, especially when you’re just starting out.
Step-by-Step Guide to Sketching Your First Vehicle
Let’s dive into the core process. Remember to draw lightly at first so you can easily erase and adjust your lines. Step 1: Laying the Foundation – Basic Shapes
Begin by establishing the main body of your car. Think of it in terms of simple geometric forms.
Let’s dive into the core process. Remember to draw lightly at first so you can easily erase and adjust your lines.
Step 1: Laying the Foundation – Basic Shapes
Begin by establishing the main body of your car. Think of it in terms of simple geometric forms.
Start by drawing a long, slightly squashed rectangle or a basic box shape for the main body of the car. This will serve as the base. Above and slightly forward of this rectangle, draw a smaller, somewhat trapezoidal shape. This will be the cabin or passenger compartment. Connect these two shapes smoothly. Ensure the proportions feel right; the cabin is typically about one-third to one-half the length of the main body.
Step 2: Adding the Wheels and Axles
The wheels give your car stability and define its movement.
Below the main body rectangle, draw two circles for the wheels; Position them roughly under the front and back ends of the main body. Make sure they are relatively even in size. You can draw a faint horizontal line connecting the centers of these circles to represent the axle, helping you keep them aligned.
Step 3: Refining the Body Lines
Now, it’s time to give your car its distinct silhouette and make it look more like a vehicle.
Once you have these basic shapes, the process of how to draw a simple car becomes much clearer. Start rounding off the corners of the main body and cabin shapes. Smooth out the connections between the cabin and the main body. You can add a slight curve to the roofline and the front and back bumpers. Draw a curved line to separate the windshield from the rest of the cabin, and another line for the rear window.
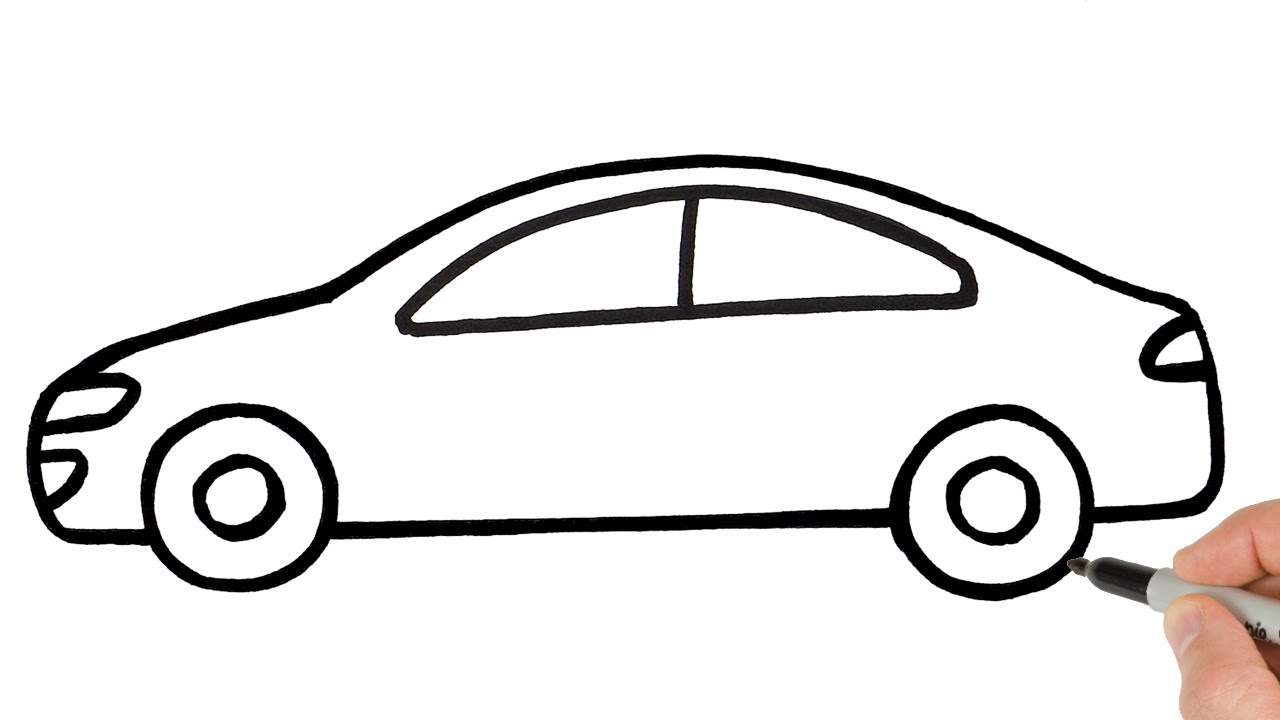
Step 4: Detailing Your Simple Car
Add the smaller elements that bring your drawing to life.
Erase any unnecessary construction lines. Now, you can add details such as circular headlights at the front and rectangular taillights at the back; Draw lines for the doors and a simple handle. Add hubcaps or simple wheel designs within the circles. You can also sketch in side mirrors and a subtle exhaust pipe at the rear. Remember, keep it simple – the goal is a basic car, not a complex model.
Tips for Improving Your Simple Car Drawings
Practice is key, but these tips can accelerate your learning and improve your results. - Practice Regularly: The more you draw, the better you’ll become. Don’t be afraid to experiment with different car styles.
- Observe Real Cars: Pay attention to the shapes and proportions of cars you see every day. Notice how different parts connect.
- Start with Light Lines: Always begin with very light pencil strokes. This makes it easier to erase mistakes and refine your drawing as you go.
- Focus on Basic Shapes: Break down complex objects into simple squares, circles, and triangles. This is fundamental to drawing anything, including cars.
- Don’t Aim for Perfection: Especially when starting, focus on understanding the process rather than achieving a masterpiece. Each drawing is a learning experience.
FAQ: Common Questions About Drawing Cars What’s the easiest way to start drawing a car?
What’s the easiest way to start drawing a car?
The easiest way is to begin with basic geometric shapes: a long rectangle for the body and a smaller trapezoid for the cabin. Then, add circles for the wheels. This simplifies the initial construction and makes the process less intimidating.
What materials do I need to draw a simple car?
You only need a few basic materials: a pencil (HB or 2B is ideal), an eraser, and some paper. A ruler can be helpful for drawing straight lines, but it’s not strictly necessary.
How can I make my car drawing look more realistic?
To add more realism, focus on details like subtle curves, shading to show form, and perspective. Observe real cars closely to understand how light interacts with their surfaces. However, for a “simple car,” maintaining a cartoonish or stylized look is perfectly fine.
Is it okay to use a ruler when drawing cars?
Absolutely! Using a ruler, especially when you’re a beginner, can help you achieve straight lines and accurate proportions for the body of the car. As you gain confidence, you can gradually rely less on it and practice freehand drawing.
Mastering how to draw a simple car is a fantastic starting point for any aspiring artist, offering a solid foundation in understanding basic shapes, proportions, and detailing. Remember that consistency and patience are your best tools. Don’t be discouraged by initial attempts; every line you draw contributes to your skill development. Keep practicing, keep observing, and most importantly, enjoy the creative process of bringing your simple car designs to life on paper.